PixeLINK Software Settings
![]() Exposure
Exposure
The exposure setting is generally the first control to
manipulate on the camera application. Set the exposure to a suitable level
by manually positioning the slider, or select on the “Auto” button to perform
an automatic calculation of a suitable exposure level. Use the “left” and
“right” arrow keys on the keyboard to make very fine adjustments to the exposure.
If the microscope has an AC light source, the automatic exposure control
may result in rolling horizontal bands (see above). Find the best exposure
setting that eliminates the horizontal banding, then use the microscope light-level
adjustments to increase or decrease the amount of light reaching the camera.
White Balance
The PL-A642 uses a Bayer RGB pattern on the sensor surface,
to obtain the color image data. Each set of Red, Green, or Blue coated pixels
is manipulated by a gain setting on the sensor. To produce a good color image,
the color balance must be adjusted for the type of light provided by the
microscope. The PL-A642 application provides an automatic white balance feature.
Click on the “Auto” button to prompt the application to perform a white balance
on the overall scene. This function takes samples from the entire scene and
adjusts the gain levels to achieve an approximate white balance. For best
results, there must be a significant amount of white or neutral density pixels
in the image. It is normal to have a blank slide under the objective allowing
the light-source to provide the white background. Varying results will be
obtained depending on the color temperature of the microscope lamp.![]()
An alternative method of performing the white balance is to use the “eye-dropper” function. Click the mouse on the icon to the left of the “Auto” button. Next click your mouse pointer in the video preview image on an area that represents “white”, or neutral density. The application takes a sample of the pixel intensities in the area immediately surrounding the mouse pointer. Ensure that the object that you click on remains in the same place during the calibration.
An area of neutral density (equal R,G,B values producing gray) may produce
a better white balance than an all white area. An all-white area may be over
saturated with pixel values from any of the color micro-lenses, and the gain
compensation may not yield a true result. Using a neutral density (or gray)
area will avoid this possible complication.
Field of View
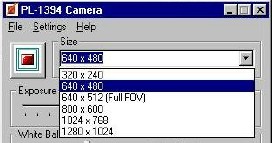 The application provides window presets for various sizes
on the sensor area, from full resolution (1280x1024) down to a very small
window at 320x240. The overall exposure of the image will be affected by
the size of the preview window. A larger field of view provides the sensor
with an ability to perform a longer exposure using the electronic “rolling
shutter”. You may notice that the frame rate from the camera appears to slow
down more than expected when using the full resolution setting. This is typically
a result of the Windows operating system attempting to clip the display preview,
if any part of it falls outside the display area, or if the preview window
has been manually resized, so that it no longer matches the dimensions of
the region of interest on the sensor.
The application provides window presets for various sizes
on the sensor area, from full resolution (1280x1024) down to a very small
window at 320x240. The overall exposure of the image will be affected by
the size of the preview window. A larger field of view provides the sensor
with an ability to perform a longer exposure using the electronic “rolling
shutter”. You may notice that the frame rate from the camera appears to slow
down more than expected when using the full resolution setting. This is typically
a result of the Windows operating system attempting to clip the display preview,
if any part of it falls outside the display area, or if the preview window
has been manually resized, so that it no longer matches the dimensions of
the region of interest on the sensor.
Saturation
The saturation slider provides a mechanism to apply a
color enhancement to the color image or a contrast to the monochrome image.
For color, the setting can be adjusted from the minimum (zero), where there
is no saturation color correction being applied to the data at all, up to
a maximum value of 200. Typically, a value between 50 and 80 will provide
the best results.
Gamma
The gamma adjustment will compensate for monitors and
displays that have a poor response in the dark picture values. It provides
a stretch to the dark pixel intensities to increase the ability to resolve
objects that appear too dark. Moving the slider to the left decreases the
gamma value, resulting in a greater stretch of the dark part of the intensity
range. This may make the image appear very noisy, if taken too far. Values
near 0.6 are fairly typical. A value of “1.0” means that gamma correction
is disabled.
 Other Settings
The accelerated mode on the application settings menu
allows the camera to operate at a frame rate that is approximately 50% faster
than the default setting. If you need a fast frame refresh rate, choose the
accelerated mode. In some cases the image from the sensor may show more vertical
pattern noise when running in the accelerated mode. The maximum exposure
time is reduced when the camera is operated at the faster rate, as data is
retrieved from the sensor more quickly and the frame rate is increased.
For more information, call Capra at (508) 650-9700
.